若您覺得文章寫得不錯,請點選文章上的廣告,來支持小編,謝謝。
If you like this post, please click the ads on the blog or buy me a coffee. Thank you very much.This tutorial will teach you how to use Blynk App to control NodeMcu's built-in LED.
需要的器材有:
Needed Material items:
1. 手機 (筆者使用Android手機) Cell Phone (Android Phone was used in this tutorial.)
2. NodeMcu
3. Micro USB Cable
步驟一:
Step 1:
在手機上安裝Blynk App後,需註冊一個帳號,帳戶是使用email當作名稱,密碼自訂,驗証碼(ATUH TOKEN)會寄到這個信箱。
After installing Blynk App on your cell phone, you have to register a new account to receive the ATUH TOKEN.

步驟二:
Step 2:
Arduino IDE 安裝Blynk程式庫
Install Blynk library for Arduino IDE.

由Arduino IDE中開啟檔案 --> 範例 --> Blynk --> Boards_WIFI --> ESP8266_Standalone
In Arduino IDE, open ESP8266_Standalone example which is located at File --> Examples --> Blynk --> Boards_WIFI --> ESP8266_Standalone

檔案需要修改auth、ssid、pass三個地方,修改完成後就可以上傳到 NodeMcu。
According your setting, the auth, ssid, pass are to be modified. Then, you can upload the firmware to NodeMcu.

2. NodeMcu
3. Micro USB Cable
步驟一:
Step 1:
在手機上安裝Blynk App後,需註冊一個帳號,帳戶是使用email當作名稱,密碼自訂,驗証碼(ATUH TOKEN)會寄到這個信箱。
After installing Blynk App on your cell phone, you have to register a new account to receive the ATUH TOKEN.
Step 2:
Arduino IDE 安裝Blynk程式庫
Install Blynk library for Arduino IDE.

由Arduino IDE中開啟檔案 --> 範例 --> Blynk --> Boards_WIFI --> ESP8266_Standalone
In Arduino IDE, open ESP8266_Standalone example which is located at File --> Examples --> Blynk --> Boards_WIFI --> ESP8266_Standalone

檔案需要修改auth、ssid、pass三個地方,修改完成後就可以上傳到 NodeMcu。
According your setting, the auth, ssid, pass are to be modified. Then, you can upload the firmware to NodeMcu.

步驟三:
使用Blynk App設計專案
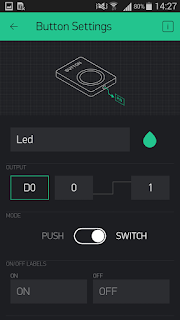
Use Blynk App to create a new project.
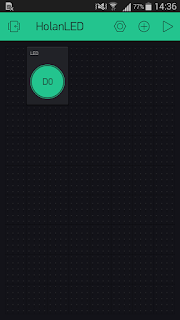
接著在專案中按下Play按鈕,就可以控制 LED 燈。
You can press the play button(the triangle icon) to control NodeMcu's LED.
結果影片:
Demo video:
參考資料:
References:
[1] http://www.blynk.cc/getting-started/
使用Blynk App設計專案
Use Blynk App to create a new project.
此例只用到一個按鈕作為LED燈的開關,而NodeMcu內建的LED的腳位為D0。
For this tutorial, we only need a switch button to control the built-in LED which is on pin D0.
接著在專案中按下Play按鈕,就可以控制 LED 燈。
You can press the play button(the triangle icon) to control NodeMcu's LED.
結果影片:
Demo video:
References:
[1] http://www.blynk.cc/getting-started/
沒有留言:
張貼留言