若您覺得文章寫得不錯,請點選文章上的廣告,來支持小編,謝謝。
避免自欺(Self-deception)的第一步:觀察自欺的自己;第二步:確認自己是找不到一個好時機開始;最後一步:請停止思考,現在開始做就對了(Just Do It)!
「接納不完美的勇氣(Courage to be imperfect)」:接納並非100%完美、有缺點的自己。
情緒並非自然發生,是為了達成某種目的而產生的。
不斷反問自己:「我究竟是為了什麼目的而發動這種情緒的?」當我們找出答案後,有可能找到解決問題的方法。
程式設計師所需要知道的資料庫觀念
若您覺得文章寫得不錯,請點選文章上的廣告,來支持小編,謝謝。
本文要來聊聊一個程式設計師需要知道資料庫觀念,主題如下:
參考 為何使用資料庫儲存資料時,需要先執行正規化? 一文。
 圖中的Application可以為C、Java、PHP等程式語言開發出來的程式。DBC是DataBase Connector的縮寫,DBC API為程式語言在處理資料庫的函式庫,DBC Driver處理與資料庫系統的通訊細節,這是因為不同的資料庫系統會有不同的資料處理方式,這裡的Driver與API是借用硬體驅動程式的觀念,目的是要讓同一個程式語言使用一套API就可以處理不同的資料庫系統。
本文要來聊聊一個程式設計師需要知道資料庫觀念,主題如下:
- 什麼是資料庫。
- 有哪幾種資料庫系統。
- 資料庫正規化。
- 程式如何與資料庫系統互動。
- 未來可能的趨勢。
什麼是資料庫
資料庫的英文為 Database = Data + Base,其中的 Base 含有基礎架構的意義在,可以把 Base 視為收集資料的集中地,不過這個集中地不是紙本的檔案室,而是電子化的儲存設備(通常為硬碟)。但當資料沒有規劃地收集起來並存放的話,要找資料的時候就會很麻煩,例如圖書館的書籍若沒有分類的話,那讀者要怎麼找書呢?而要將資料分類時,首先要找出資料之間的關聯性,這也衍生出關聯式資料庫(Relational Database),此文會以關聯式資料庫做為講解。有哪幾種資料庫系統
有了資料之後,要將資料分類時,總不能一直用人工的方式來作業吧,於是需要一套系統來建立並管理資料庫,而在電腦軟體裡,此套系統叫做「資料庫管理系統」,而關聯式資料庫管理系統是用來管理關聯式資料庫的。目前已有很多套的關聯式資料庫管理系統,比較有名的為 Oracle Database、Microsoft SQL Server、MySQL、IBM DB2等。資料庫正規化
正規化是為了消除重複資料所做的處理,可以用來減少資料儲存異常的情況發生。此部分可參考 為何使用資料庫儲存資料時,需要先執行正規化? 一文。
程式如何與資料庫系統互動
下圖為程式與RDBS連線時的概念圖:未來可能的趨勢
關聯式資料庫系統已存在很久了,但是由於大數據的需求,而RDBS在處理大數據方面的速度通常不是很理想(或不合適),於是有以JSON格式為主的DB出現,例如MongoDB。此外也有以檔案為主的的分散式檔案系統,例如Hadoop。這是因為在處理大數據時,有可能處理聲音、影像等非文字的資料,而關聯式資料庫在一開始設計時,並沒有考慮到Big Data的議題。Big Data的資料庫系統要怎麼選擇,筆者本身沒有深入研究,所以只能點到為主。從繪圖中來學數學
若您覺得文章寫得不錯,請點選文章上的廣告,來支持小編,謝謝。
最近筆者在網路上看到一篇文章:【太狂了!神人靠算式畫出米奇、小叮噹...媽媽說把數學學好果然是對的!】文中提到一位愛好數學的日本人展示如何使用數學式子來畫出麵包超人、米奇、小叮噹,除此之外還可以呈現動畫的效果。
麵包超人範例網址:https://www.desmos.com/calculator/ssntlymwp5
筆者一時好奇,就找到 https://www.desmos.com/,此網站上有好多的Demo啊!於是忍不住寫了網誌來做筆記了 :-)
最近筆者在網路上看到一篇文章:【太狂了!神人靠算式畫出米奇、小叮噹...媽媽說把數學學好果然是對的!】文中提到一位愛好數學的日本人展示如何使用數學式子來畫出麵包超人、米奇、小叮噹,除此之外還可以呈現動畫的效果。
麵包超人範例網址:https://www.desmos.com/calculator/ssntlymwp5
筆者一時好奇,就找到 https://www.desmos.com/,此網站上有好多的Demo啊!於是忍不住寫了網誌來做筆記了 :-)
在 Tinkercad 上使用Arduino模擬器(Arduino Simulator on TinkerCAD)
若您覺得文章寫得不錯,請點選文章上的廣告,來支持小編,謝謝。
If you like this post, please click the ads on the blog or buy me a coffee. Thank you very much.前言(Preface)
Autodesk Circuits 已被移至 Tinkercad (https://www.tinkercad.com/circuits),除了原本的功能外,現在還可以使用Scratch積木來設計程式,實在是很方便。Autodesk Circuits has moved to Tinkercad (https://www.tinkercad.com/circuits). Tinkercad Circuits has a additional function that enable Scratch-based programming to design a Arduino program. That's very easy and convenient for a beginner to learn C programming.
本文將簡短介紹兩個功能:
- Circuits 電路設計
- 積木程式設計
Two features are introduced in this tutorial:
- Circuits design
- Scratch-based programming
Circuits 電路設計(Circuits Design)
登入TinkerCAD後的畫面如下,請點選畫面左方的 Circuits 文字。
After logging in TinkerCAD, click the Circuits button on the left of the screen.

接著點選 Create new Circuit 文字,就會開啟電路設計畫面。
Then, click Create new Circuit button to open a new circuit project web page.

這裡就以讓LED閃爍為例子,先看個在下錄製的教學影片:
Here is a tutorial video for creating a LED blink.
注意 LED的短腳接在 UNO GND,LED長腳接在電阻後,再從電阻接至 UNO D13,完成的電路圖如下:
The finished circuits are the below picture. Please Note: a resistor(above 100 ohm) is needed for connected the LED and UNO.
 有沒有注意到,我們不用程式設計,就可以控制 LED 燈的閃爍了。這是為什麼?
Here is a notice: the LED now is blinking without any programming. Why?
After logging in TinkerCAD, click the Circuits button on the left of the screen.

接著點選 Create new Circuit 文字,就會開啟電路設計畫面。
Then, click Create new Circuit button to open a new circuit project web page.

這裡就以讓LED閃爍為例子,先看個在下錄製的教學影片:
Here is a tutorial video for creating a LED blink.
注意 LED的短腳接在 UNO GND,LED長腳接在電阻後,再從電阻接至 UNO D13,完成的電路圖如下:
The finished circuits are the below picture. Please Note: a resistor(above 100 ohm) is needed for connected the LED and UNO.

Here is a notice: the LED now is blinking without any programming. Why?
積木程式設計
說明程式積木之前,請先將原本接在 UNO D13 的線換到 UNO D2,接著在按下 Code Editor 按鈕(藍色箭頭所指)。Before showing the Scratch-based programming, let's change the wire between the LED and the UNO board (rrom D13 to D2). Then, click the Code Editor(see the blue arrow on the below picture) to open Code Editor screen.

會在畫面下方出現程式設計的視窗,此視窗的左方為目前TinkerCAD Circuits所提供的積木程式,中間專案所設計的程式,右方為對應的Arduino C程式碼。
The Code Editor screen will appear on the bottom of the screen.

TinkerCAD預設會建立讓UNO板上頭有標示 L 文字的 LED 燈閃爍,而這個燈是與 UNO 的數位腳位 13 相連的。現在按下 Start Simulation 的按鈕時,會發現紅色 LED 燈不會閃爍了,那要怎麼做才能讓紅色 LED 燈閃爍呢?
TinkerCAD will create a Blink project for the built-in LED which are marked with a 'L' label. The built-in LED is connected with UNO digital pin 13. Now, the red LED doesn't blink when you click "Start Simulation" button. For blinking the red LED, what other things should be done?
請看底下的教學影片(Here are the tutorial video for coding):
完成的範例網址(The completed example):https://www.tinkercad.com/things/kTkVXA7385q
參考資料(Reference)
[1] Circuits Tutorials on Tinkercad: https://www.tinkercad.com/learn/
Webduino 模擬器:按鈕控制Youtube影片 (Control the speed of a youtube video with Webduino)
若您覺得文章寫得不錯,請點選文章上的廣告,來支持小編,謝謝。
If you like this post, please click the ads on the blog or buy me a coffee. Thank you very much.Webduino Blockly provides blocks that control the speed of a video. And this tutorial teaches you how to do that.
模擬器的接線方式為五個按鈕開關,按鈕開關的S分別接上 D2、D3、D4、D5、D6,按鈕開關的GND接UNO GND,按鈕開關的V 接 UNO 5V。
We need five buttons in Arduino simulator. The wiring are the following:
Button S Pin --> Arduino UNO D2, D3, D4, D5, D6 (respectively)
Button G Pin --> Arduino UNO GND
Button V Pin --> Arduino UNO 5V

程式積木(The Code)

範例網址(Example URL):https://simulator.webduino.io/#-L-yVtNg59rGK9tzhcqk
影片(Demo Video):
程式積木(The Code)

範例網址(Example URL):https://simulator.webduino.io/#-L-yVtNg59rGK9tzhcqk
影片(Demo Video):
Webduino 模擬器:打地鼠 (Webduino Simulator: Hit Mouse Game)
若您覺得文章寫得不錯,請點選文章上的廣告,來支持小編,謝謝。
If you like this post, please click the ads on the blog or buy me a coffee. Thank you very much.This tutorial use three buttons and three LEDs to create a Hit Mouse Game simulation.
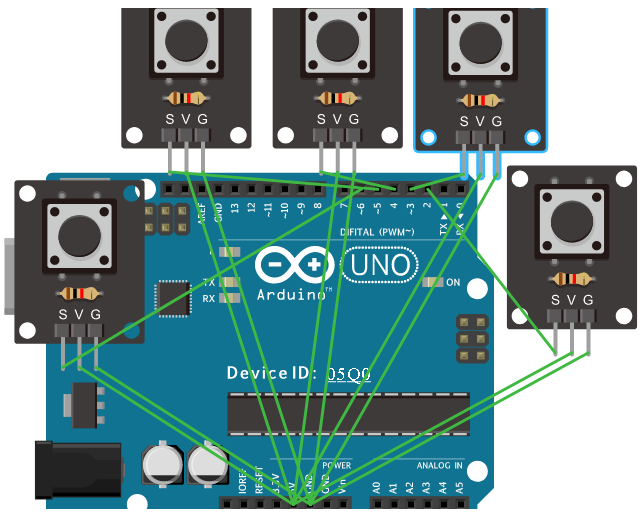
模擬器的接線方式為三個LED燈,LED短腳都接 UNO GND,LED長腳分別接UNO D11、UNO D10 、UNO D9,三個按鈕開關,按鈕開關的S分別接上 D4、D8、D12,按鈕開關的GND接UNO GND,按鈕開關的V 接 UNO 5V。
- LED anode --> UNO D11, D10, D9 ( respectively )
- LED cathode --> UNO GND
- Button S(signal) --> UNO D4, D8, D12 ( respectively )
- Button V(voltage) --> UNO 5V
- Button G(ground) --> UNO GND

程式積木請參考範例網址(Block Code URL):https://simulator.webduino.io/#-L-ktU9IRTQ2P46seIMA
影片(Demo Video):
Webduino 模擬器:按鈕開關控制三色LED燈( Webduino Simulator: Control RGB LED with Buttons )
若您覺得文章寫得不錯,請點選文章上的廣告,來支持小編,謝謝。
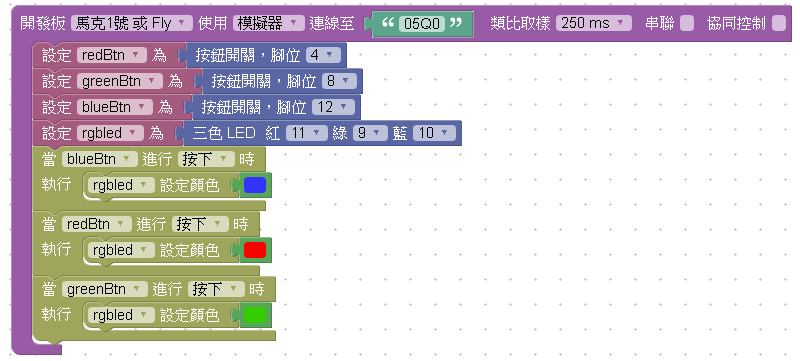
本篇就要用Webduino模擬器的按鈕開關來控制 RGB 三色燈的顏色。
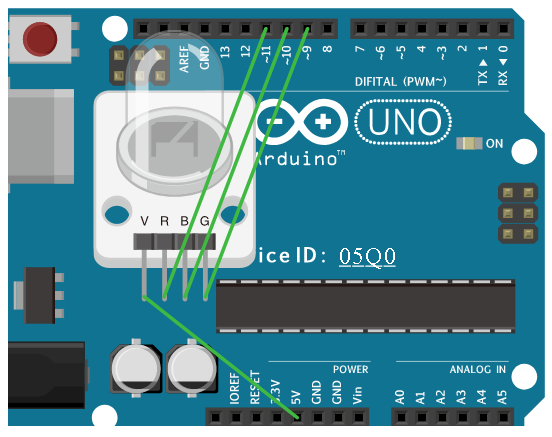
模擬器的接線方式為一個 RGB 三色 LED燈,三色燈的 V 接 UNO 5V,三色燈的 R 接 UNO D11,三色燈的 B 接 UNO D10 ,三色燈的 G 接 UNO D9,與三個按鈕開關,按鈕開關的S分別接上 D4、D8、D12,按鈕開關的GND接UNO GND,按鈕開關的V 接 UNO 5V。
本篇就要用Webduino模擬器的按鈕開關來控制 RGB 三色燈的顏色。
模擬器的接線方式為一個 RGB 三色 LED燈,三色燈的 V 接 UNO 5V,三色燈的 R 接 UNO D11,三色燈的 B 接 UNO D10 ,三色燈的 G 接 UNO D9,與三個按鈕開關,按鈕開關的S分別接上 D4、D8、D12,按鈕開關的GND接UNO GND,按鈕開關的V 接 UNO 5V。

程式積木為:
影片:
Webduino 模擬器:任意彩色燈( Webduino Simulator: Color LED at One's Desire )
若您覺得文章寫得不錯,請點選文章上的廣告,來支持小編,謝謝。
Webduino模擬器有提供網頁調色盤來選擇顏色,本篇就要用它來控制 RGB 三色燈的顏色。
模擬器的接線方式為一個 RGB 三色 LED燈,三色燈的 V 接 UNO 5V,三色燈的 R 接 UNO D11,三色燈的 B 接 UNO D10 ,三色燈的 G 接 UNO D9。

範例網址:https://simulator.webduino.io/#-L-VB8Jw-m8ye_aiWGWP
影片:
Webduino模擬器有提供網頁調色盤來選擇顏色,本篇就要用它來控制 RGB 三色燈的顏色。
模擬器的接線方式為一個 RGB 三色 LED燈,三色燈的 V 接 UNO 5V,三色燈的 R 接 UNO D11,三色燈的 B 接 UNO D10 ,三色燈的 G 接 UNO D9。
程式積木為:
範例網址:https://simulator.webduino.io/#-L-VB8Jw-m8ye_aiWGWP
影片:
Webduino 模擬器:超音波的朦朧美 (Webduino Simulator: Image Transparency with Ultrasonic)
若您覺得文章寫得不錯,請點選文章上的廣告,來支持小編,謝謝。
這次要用Webduino模擬器來控制網頁圖片的透明度。用到超音波的距離來控制,距離越近圖片卻清晰,距離越遠圖片越透明。
模擬器的接線方式為超音波(HC-SR04)的 VCC 接 UNO 3.3V,超音波(HC-SR04)的 GND 接 UNO GND,超音波(HC-SR04)的 Trig 接 UNO D10,超音波(HC-SR04)的 Echo 接 UNO D9。

程式積木部分為:

這次要用Webduino模擬器來控制網頁圖片的透明度。用到超音波的距離來控制,距離越近圖片卻清晰,距離越遠圖片越透明。
模擬器的接線方式為超音波(HC-SR04)的 VCC 接 UNO 3.3V,超音波(HC-SR04)的 GND 接 UNO GND,超音波(HC-SR04)的 Trig 接 UNO D10,超音波(HC-SR04)的 Echo 接 UNO D9。
範例網址:http://simulator.webduino.io/#-L-FmMOCSJeOy3NtQU8U
影片:
訂閱:
文章 (Atom)